

How To Install Windows On Ubuntu 14.04
Introduction
Those instructions have helped people install Ubuntu since 12.04 just now with the introduction of Ubuntu 14.04 and many Windows users upgrading to Windows 8.i there are a few new challenges that have been brought to the table.
Over the weekend I have played around with dual booting Ubuntu 14.04 and Windows 8.1 and the following commodity highlights the steps that I took to go it to work.
It may be tempting to jump in and skip the steps that show you how to back up your Windows files merely I tin can't impress on you enough the importance of doing so.
Update
I have written a new guide for dual booting Windows 8.1 and Ubuntu.
There are a few differences to the instructions below using the new method which are mainly as follows:
- The backup section advises only using Macrium Reflect for creating system images
- The USB drive created uses a new method to create a UEFI bootable USB drive
- Instead of using the "something else" option the new guide allows you to use the default install alongside Windows 8.1 option.
In essence I have establish the Windows recovery tools to be flaky with regards to restoring from a system image. (especially if you motion the recovery image around). For case if you create a recovery image on an external hard bulldoze and so copy it to another external difficult drive or NAS drive there is no guarantee that Windows 8.1 volition recognise information technology.
I have used Macrium Reverberate for creating system images and restoring them (even after moving images effectually) and it works. The software is gratuitous to use as well although there is a paid for version for actress options.
Creating a UEFI bootable just Ubuntu USB drive ensures that Ubuntu is installed to a GPT partition. The Ubuntu installer therefore also recognises the existence of the Windows viii.one partition. This enables y'all to cull the default option for installing alongside Windows 8.i
Using this method it appears that there is no longer a requirement to turn off secure boot.
I still had to manually set the Windows bootloader using BCDEdit.
Feel costless to give the new guide a try or you can stick with the tried and trusted method below.
A review of Ubuntu 14.04
Earlier you start it might be worth reading the latest review of Ubuntu 14.04 to brand certain dual booting with Windows viii.1 is something yous want to exercise.
1. Back up Windows
In that location are two steps to backing up Windows:
- Create a recovery bulldoze for bankroll up Windows 8.1
- Create a file history for backing up personal files
For the recovery drive y'all volition need a. Insert the USB drive into your figurer. You lot should make sure that you have no information that y'all need to keep on the drive equally it will exist wiped during this process. If you don't have a USB drive you can create recovery DVDs.
For the file history backup I would recommend using an only it depends on how much information you have. If yous don't take much so a USB bulldoze volition practice. If you have naught else to hand you tin backup to DVDs.
This guide assumes that you are using Windows viii.1 simply most of the steps will exist like to Windows eight.
In my original guide I showed how to create recovery disks and a system paradigm using the Windows 7 recovery tools.
In this guide I use the simpler Windows 8 recovery drive tool.
To create a recovery drive press the super fundamental (Windows cardinal) on your keyboard and and then click on the magnifying drinking glass in the top right corner.
Now start typing "Recovery".
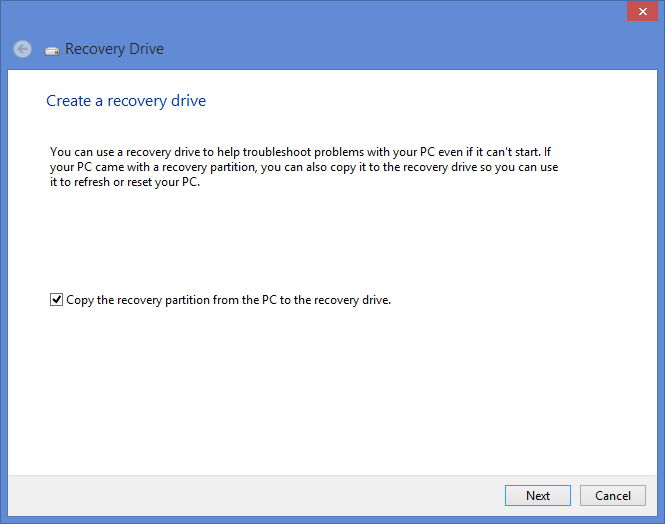
An option will appear called "Create a recovery drive". Click this option. You will exist asked if y'all are happy to give permissions for this application to run. The reply is yeah you do.
A recovery bulldoze lets you get Windows eight.ane back to a working land.
When the "Create a recovery drive" window appears click "Next" to continue.
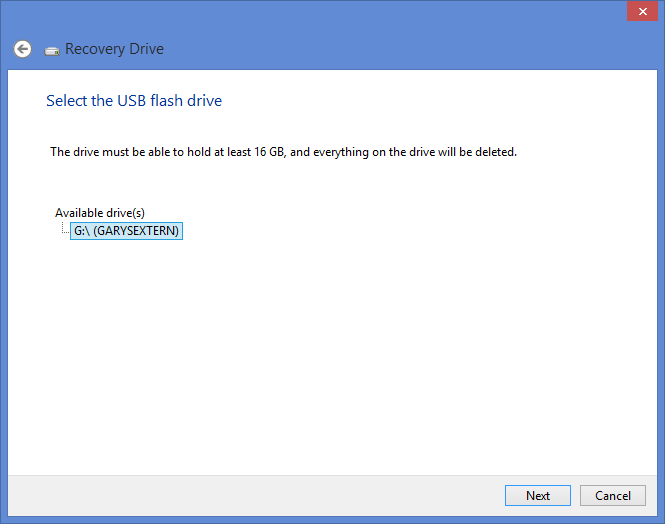
Click the bachelor USB drive to exist used and click "Adjacent".
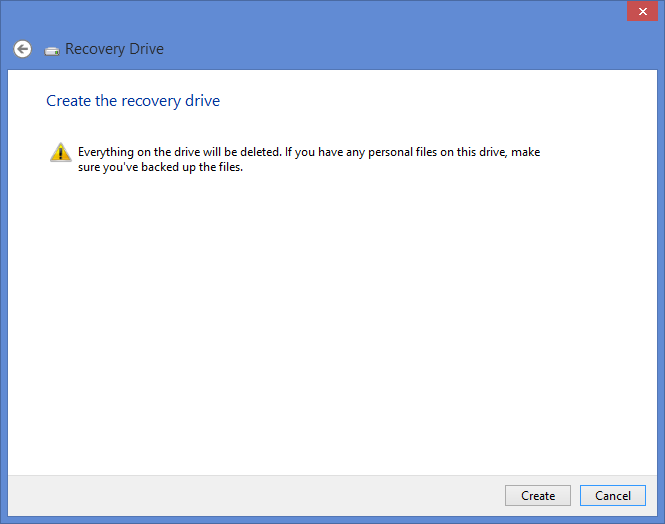
A bulletin will appear confirming that y'all want to create the bulldoze and you are warned again that all the data on the target drive volition be deleted.
If yous are happy that yous don't need annihilation on your recovery drive click "Create".
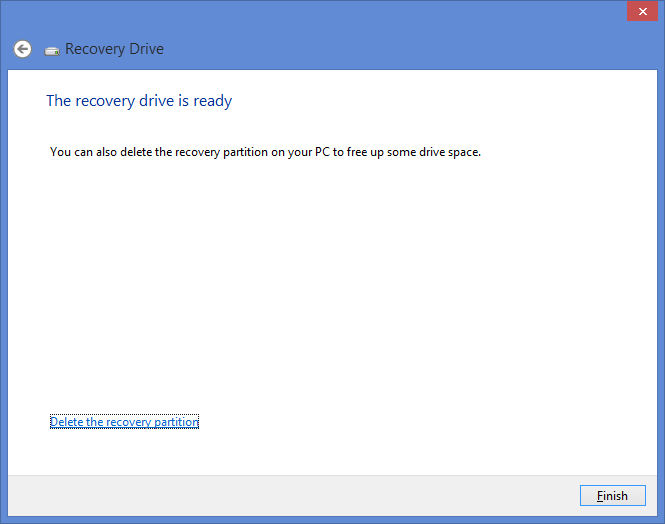
It will take a few minutes for the bulldoze to be created but eventually a screen will appear stating that the drive is ready.
Safely remove the drive, put it in a modest plastic bag like a sandwich bag or in an envelope. Characterization the pocketbook or envelope and place it somewhere very safe.
If something goes wrong either whilst installing Ubuntu or afterward in time you will exist grateful that y'all followed these steps.
Now insert the drive that y'all want to apply for storing all your personal data.
To be honest you should practise this whether you programme to proceed installing Ubuntu or not.
Press the "super" key (Windows central) on your keyboard and and then press the search icon in the acme correct corner.
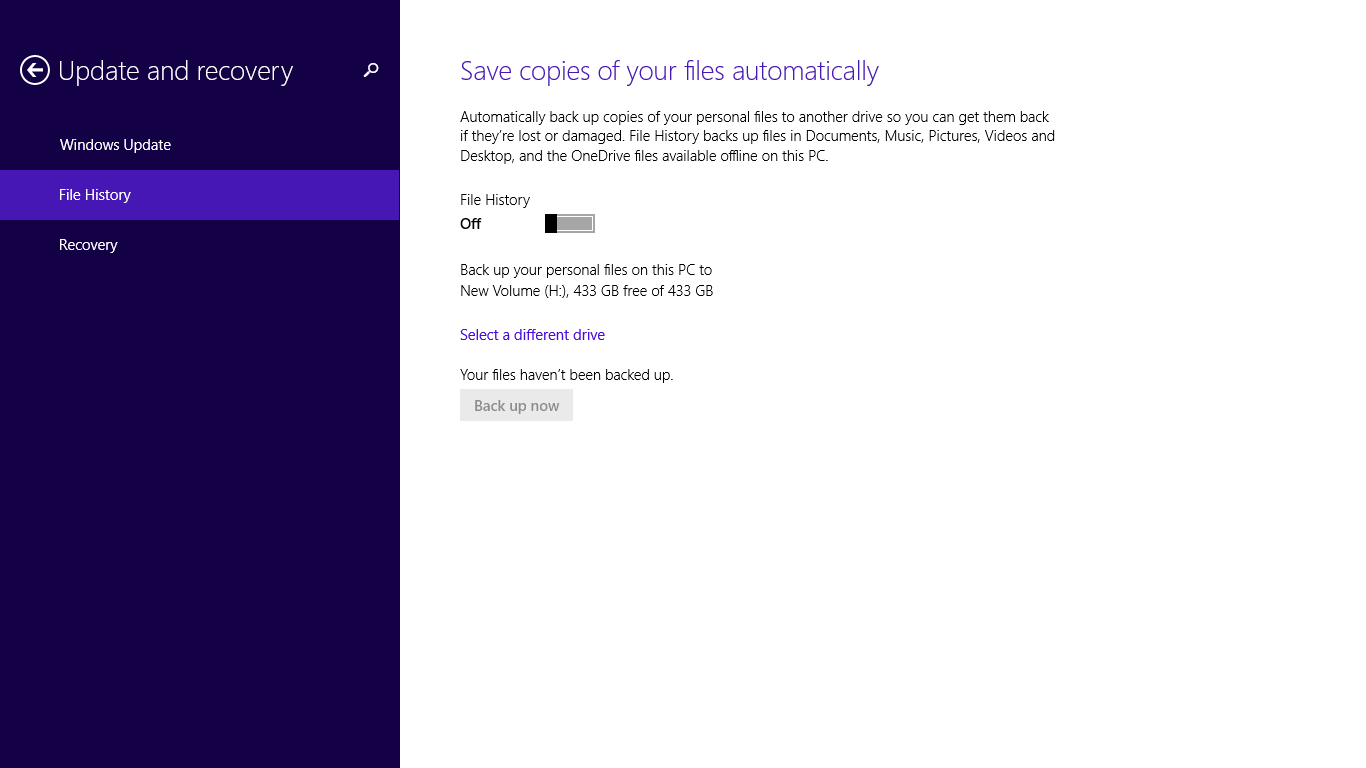
Enter the words "File History". Click the pick that says "Salvage fill-in copies of your files with File History".
A screen like to the one above should announced. Click on the "Off" push to motion picture the switch to "On" for File History.
Click the link that says "Select a unlike drive". Find the drive that you desire to back up to and click "Back up now".
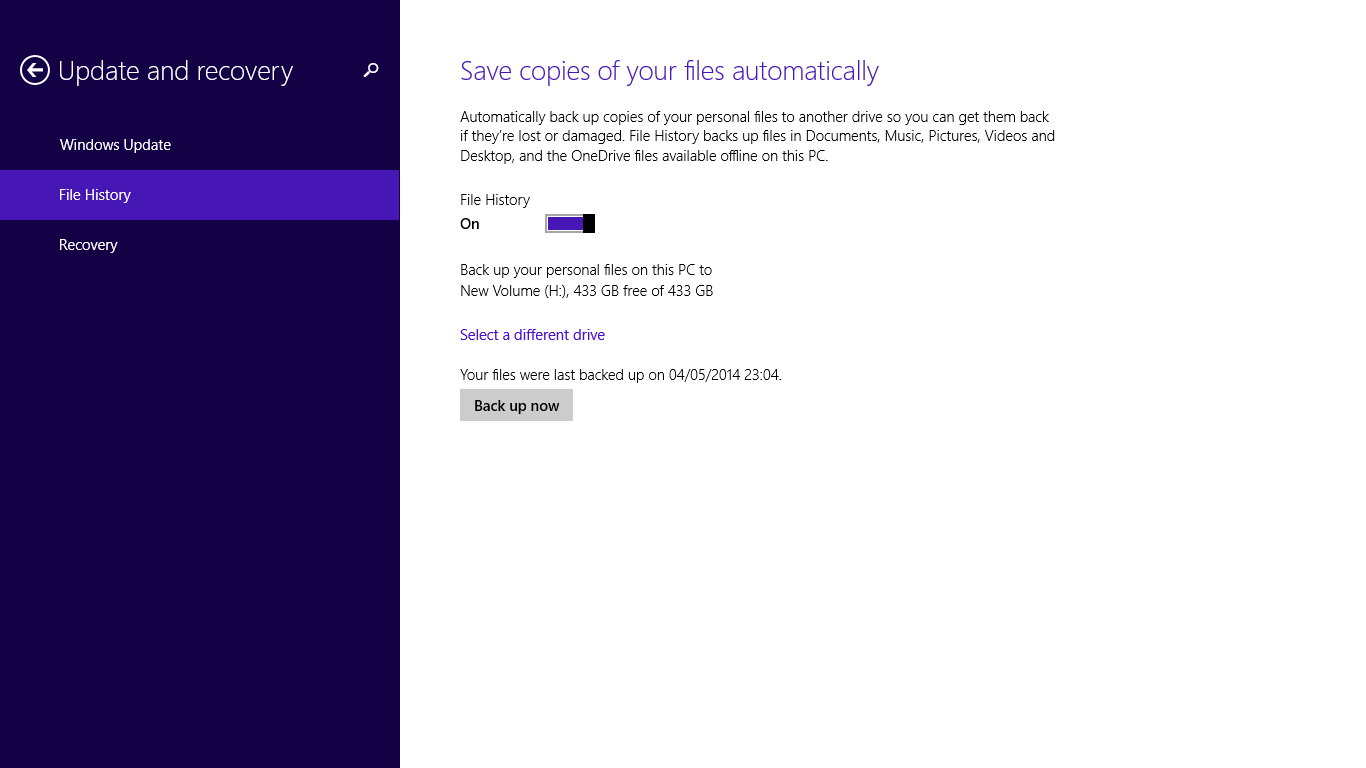
After a while all your files will be backed up to the new drive.
Notation that this application assumes that you store all of your files nether your Documents, Music, Pictures, Videos and Desktop binder. If y'all don't then I would recommend copying any file that that isn't stored in these folders manually using Windows Explorer.
2. Create a bootable Ubuntu USB drive
If yous want to skip a step or if yous have a poor internet connection then you lot can . Of course if you do that you will need to bookmark this page and wait until the USB drive arrives in the post.
If yous choose to create your own bootable USB drive you volition need another blank USB drive to continue.
Insert the USB drive into your computer.
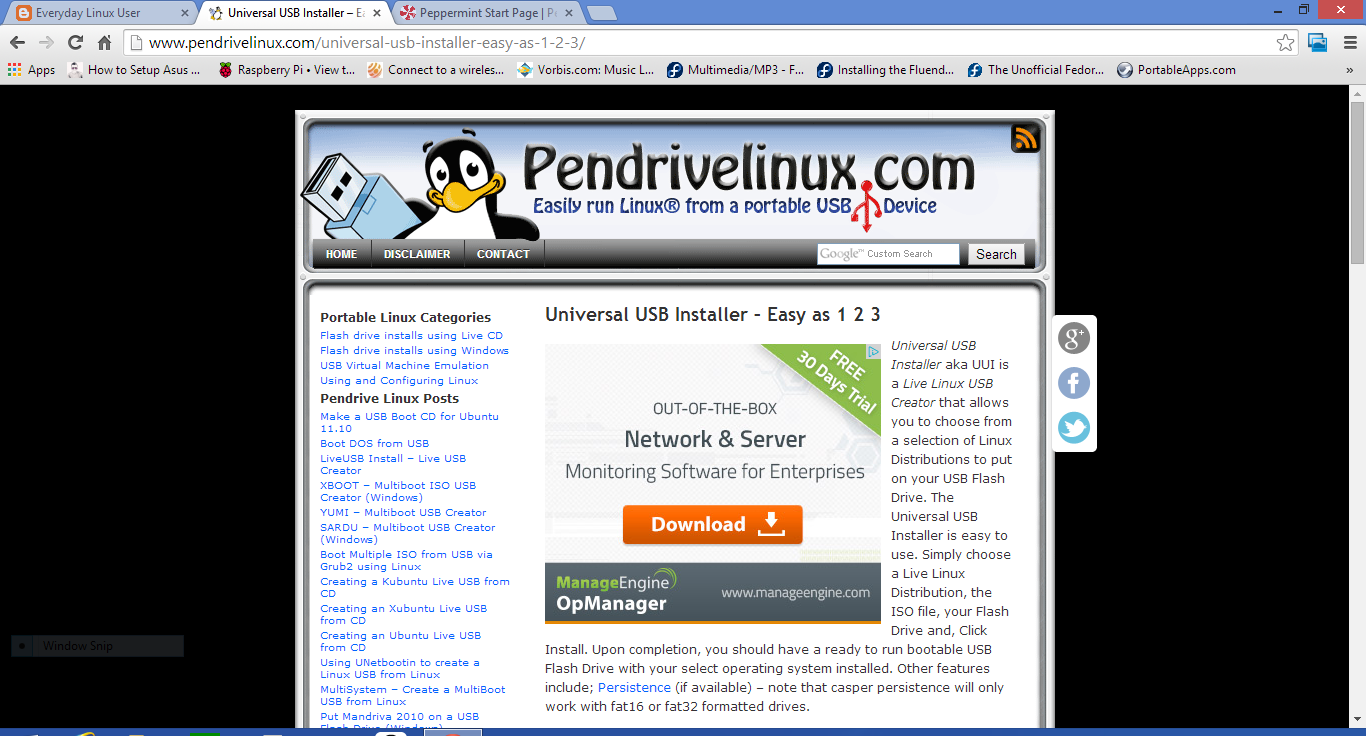
Follow the above link for pendrive Linux and curlicue one-half manner down the folio until you see the "Download UUI" link. Click on the download link and expect for the program to download.
When the download has completed double click on the executable.
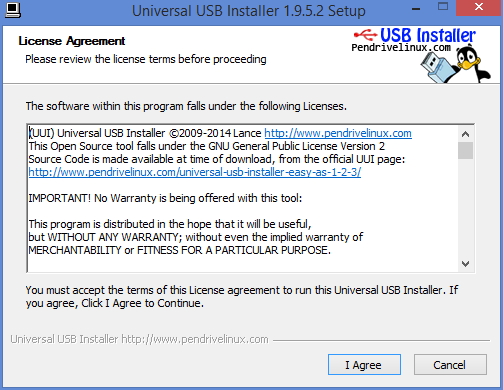
When the license agreement screen appears read it and and so click "I Agree" if y'all accept the license.
Creating the drive is fairly straight frontward.
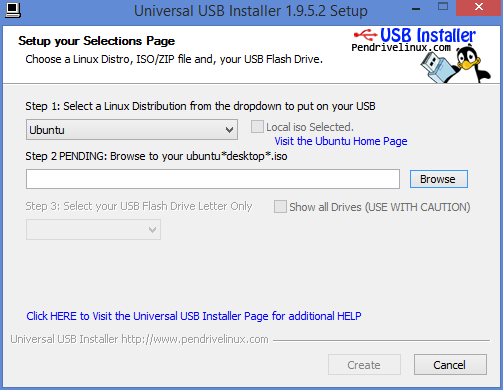
The starting time thing to do is choose your distribution of choice, in this case Ubuntu, from the dropdown list.
Click on the "Browse" push. Notice the downloaded Ubuntu ISO.
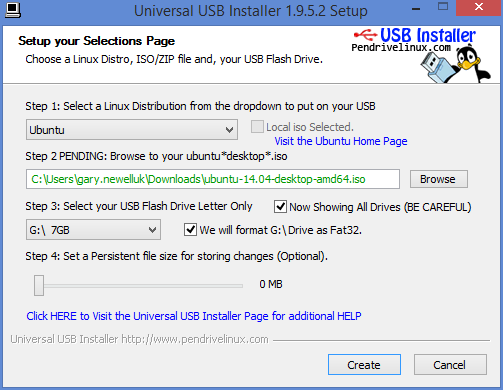
Select your chosen USB drive letter and brand sure that the "We volition format" pick is checked.
At this signal y'all tin create the USB bulldoze so that it persists information. This makes it possible to install software when using the live Ubuntu version and it will nevertheless be available the next fourth dimension yous boot from the USB drive.
Click "Create" to continue.
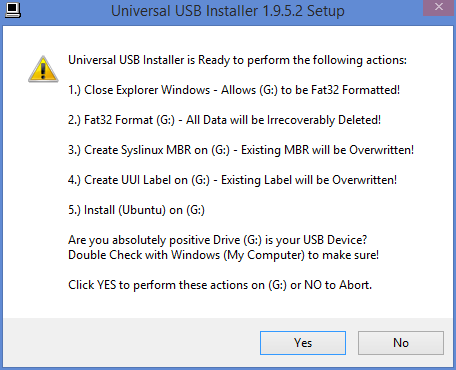
A summary screen will tell you lot what is about to happen.
Basically your USB drive is about to exist completely wiped and Ubuntu is well-nigh to be installed as a live epitome to it.
If you are happy to go on click "Yes".
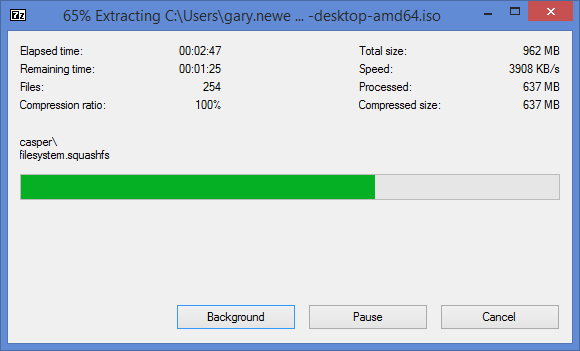
You lot will at present see a progress bar showing how far through the process the installer is and how long information technology is expected to last.
Feel free to become a comfort pause, take a drink or boil and egg at this point.
3. Shrink your Windows division
Windows takes upward the whole of the drive when it is first installed. In social club to install Ubuntu you will need to make space for information technology.
Press the "super key" (Windows key) on your keyboard and click the magnifying glass in the top right corner. In the search box start typing "Partitions".
Click on the pick called "Create and format partitions". This will bring up the "Disk Management" screen.
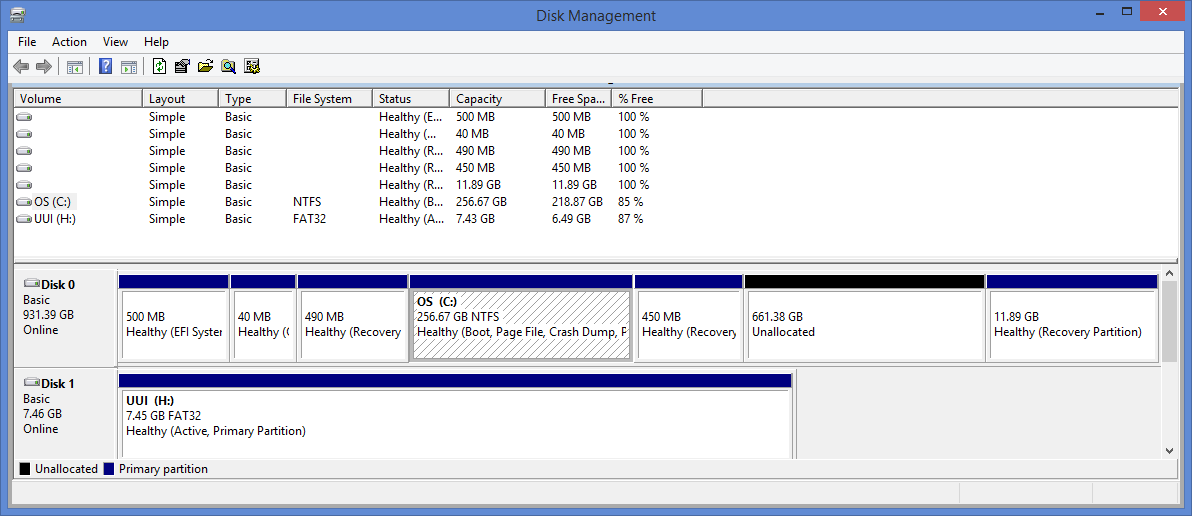
To shrink the bulldoze, right click on the "Bone (C:)" volume and select "Shrink volume".
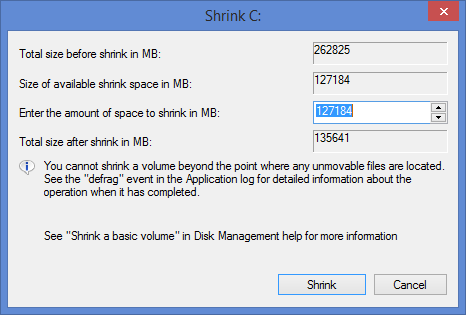
A screen will appear showing how much you tin can shrink the drive past. You tin can of grade choose to shrink the drive by less than offered merely never go for any more offered equally yous will break your Windows 8.1 operating system if you practise.
Click "Compress" to continue.
When you are finished you will run into that there is a lot of unpartitioned infinite. This is where Ubuntu will be installed.
iv. Turn off fast kicking
To be able to kicking to your Ubuntu USB bulldoze you volition demand to turn off the fast kick option.
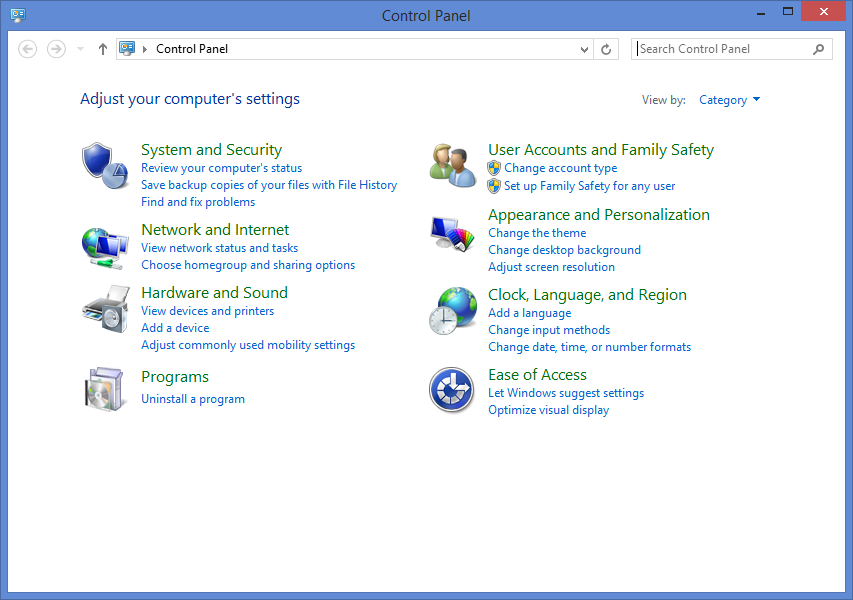
Press the "super" key (Windows key) and then click the magnifying glass in the tiptop right corner.
Enter "Command Panel". Click on the "Control Panel" option that appears.
When the "Command Panel" appears click on the "System and Security" heading.
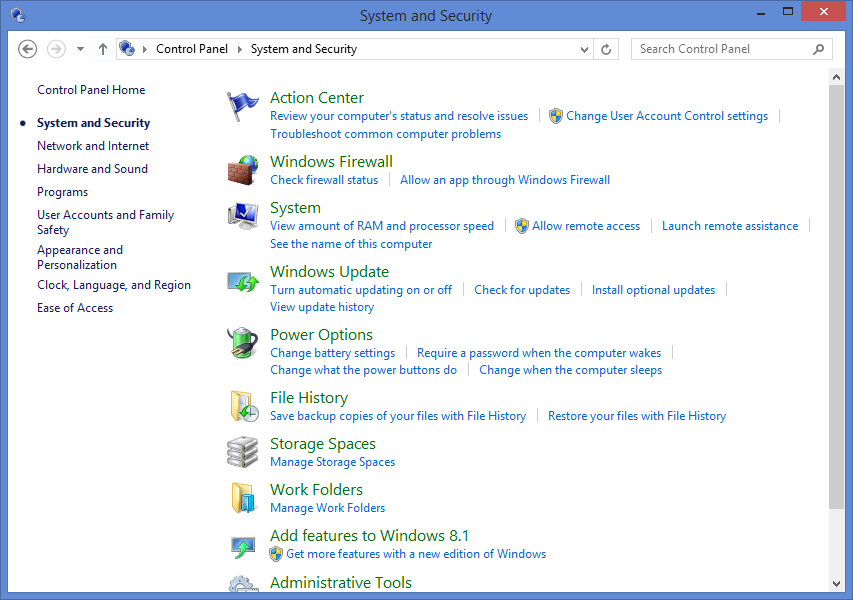
Now click on "Power Options".
On the following screen click on "Choose what the power button does".
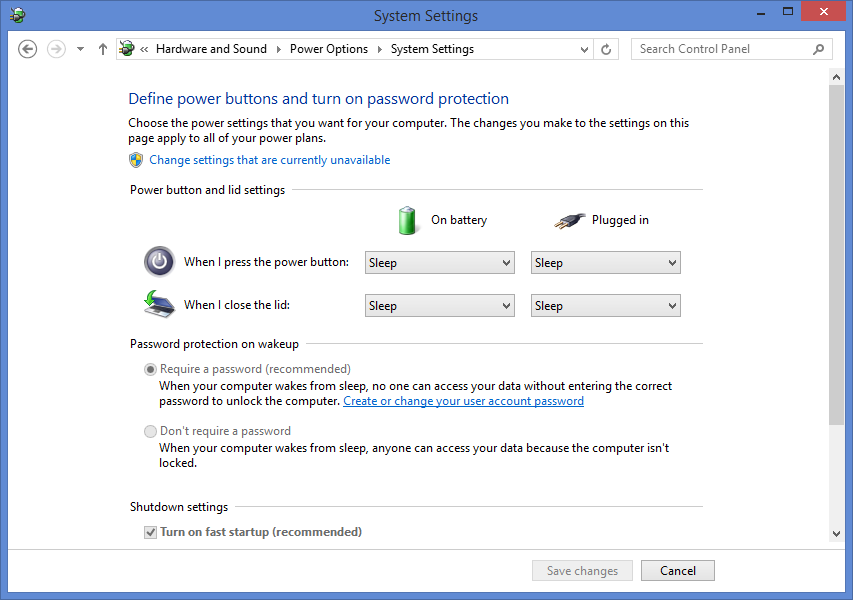
A screen will appear with the heading "Define power buttons and plough on password protection".
Roll downward until you come across "Shutdown Settings".
An selection should be available called "Turn on fast startup" (recommended).
Uncheck this choice.
Click "Save Changes".
5. Turn off secure boot
In theory yous don't need to do this whatever more. In exercise it is almost certain that you will.
Turning off secure kicking depends on the make and model of your computer as each 1 has slightly different methods for turning it off.
Basically though click on the "super" central (Windows fundamental) and and then click on the power icon next to your user name.
Concur down the shift fundamental on your keyboard and select restart figurer. Proceed the shift key held down until your figurer reboots.
You lot volition at present have an option to go into your UEFI kicking settings.
Inside the UEFI settings await for the pick to turn off secure boot. You don't have to switch to legacy fashion and y'all shouldn't switch to legacy mode as this volition not help your cause.
Save and get out the UEFI settings
vi. Install Ubuntu
When yous have turned off secure kicking, save and reboot. Yous volition probably cease up back in Windows.
Now at this indicate to boot into Ubuntu on the USB bulldoze I had to once more concord down the shift key whilst rebooting the reckoner.
One of the options that appeared permit me boot from the USB drive into Ubuntu fourteen.04 alive and you should have a like option available to you.
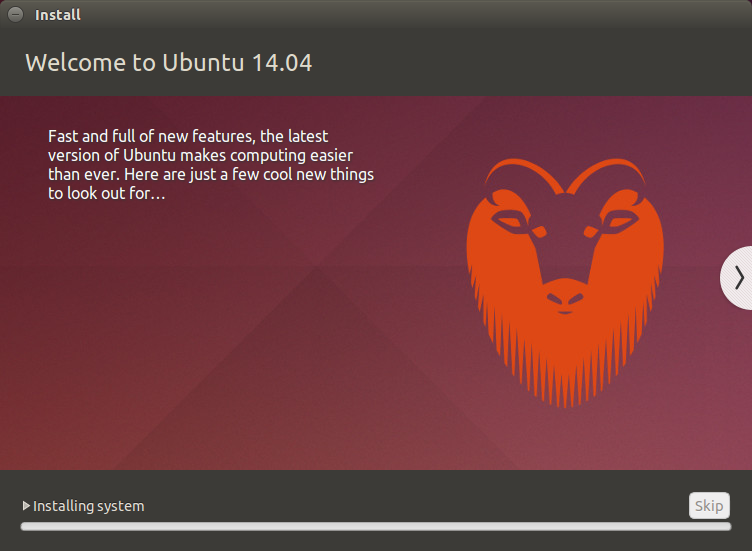
When you first boot into the live version of Ubuntu you lot will be presented with a screen similar to the one above. The but difference is that I have closed the window that shows all the keyboard shortcuts to get in easier to highlight the "Install Ubuntu fourteen.04 LTS" icon.
To brainstorm the installation double click on the "Install Ubuntu 14.04 LTS" icon.

The first thing you demand to do is make up one's mind which language you lot would like to use.
Unless you experience like the claiming isn't great enough I would choose the language that you would normally apply.
Click "Side by side" to continue.
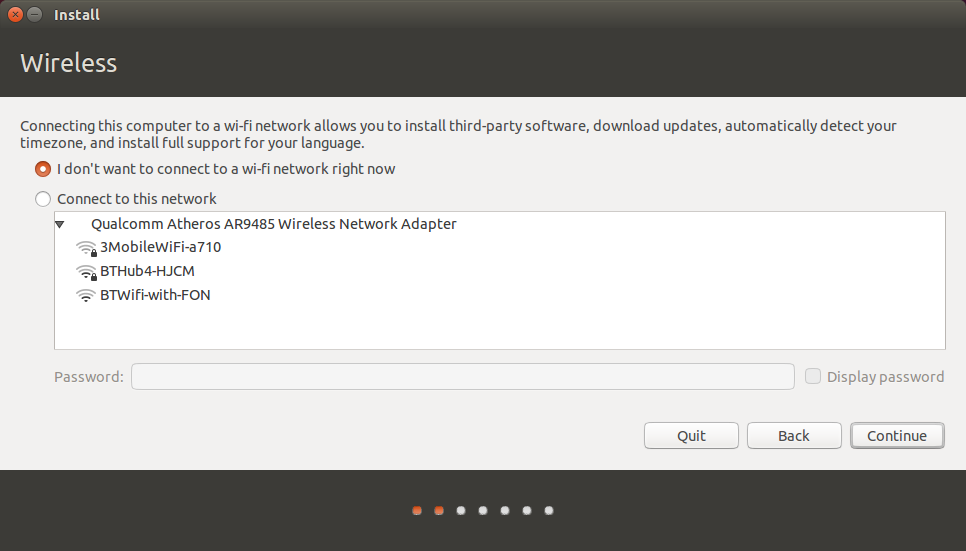
The next screen lets you choose which internet connection to use whilst installing Ubuntu.
I always opt for not wanting to connect and there is a practiced reason for that.
I live in the countryside and my internet connectedness is poor. I don't want the installer failing half way through because the connection dropped.
I prefer to install the operating system and run updates as a separate task subsequently on.
If y'all take a good broadband connection yous may wish to connect to it now so that you download updates as you become. This will boring down the initial install only will save time later on as yous won't have to install lots of updates.
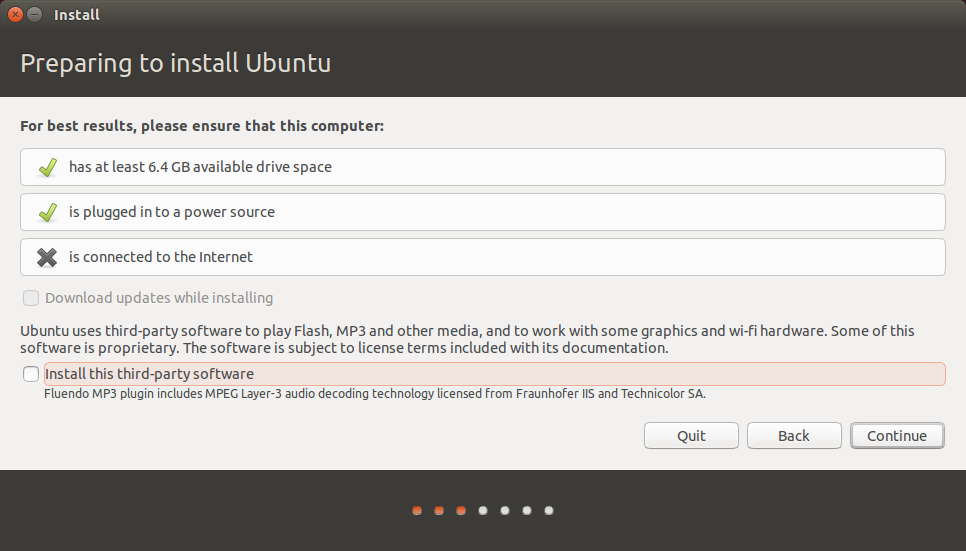
When y'all click "Next" you will exist shown a tick list highlighting how prepared y'all are for installing Ubuntu.
Every bit y'all can meet I take 2 ticks because I take enough disk space and I am plugged into a power source. I chose not to connect to a network every bit this phase (hence the cross).
Click "Continue".
In the by there used to be an option on the "Installation Type" screen to install alongside Windows.
If y'all are installing aslope Windows 7 on a not-EFI based system then you will still have that option.
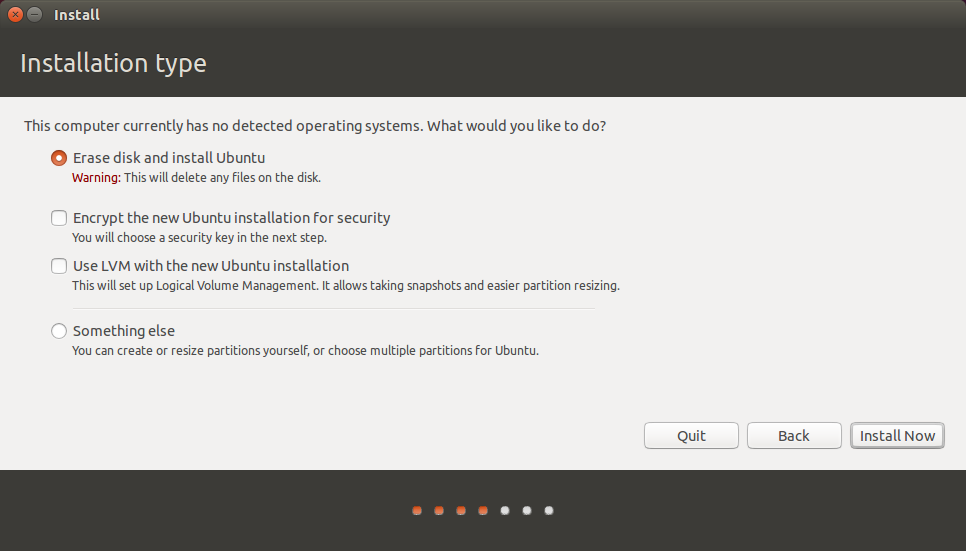
Click on "Something Else" and click "Next".
The adjacent screen may wait rather intimidating but it is just showing your electric current disk layout.
Be very careful with the next few steps.
If you oasis't taken that Windows backup, quit the installation, reboot and follow step i of this tutorial again.
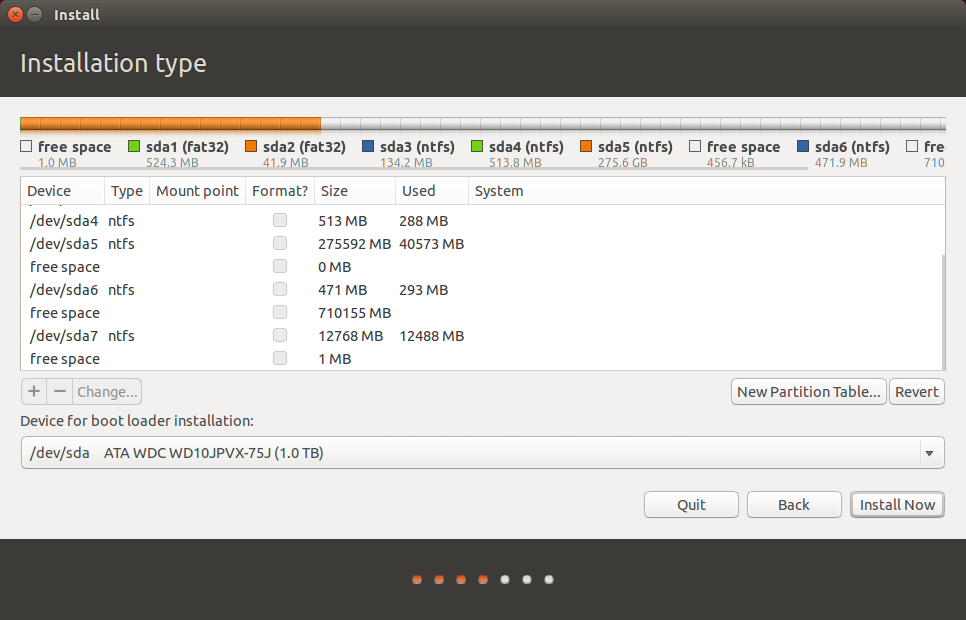
Expect at the paradigm higher up. You will see a large portion of free space (710155 MB). This is where I put Ubuntu.
The complimentary space is going to exist split up into 3.
The starting time partition is for Ubuntu and will be 50 Gigabytes in size.
The second division is for your dwelling house partitioning and stores configuration files and your personal files such as music, pictures etc.
The third partition is for swap space and is used for intensive operations and suspending the computer.
When you have found the partitioning with gratis infinite, click on it and printing the plus symbol (+) under the disk layout.
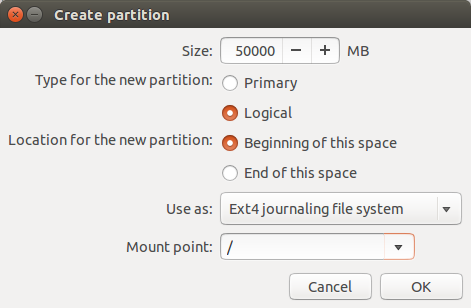
In the size box enter 50000, select logical as the partition type, select beginning of this infinite and choose EXT4 as the file organisation.
For the mount point choose / (this means root).
Click "OK".
The disk layout screen should now prove a new partition for /.
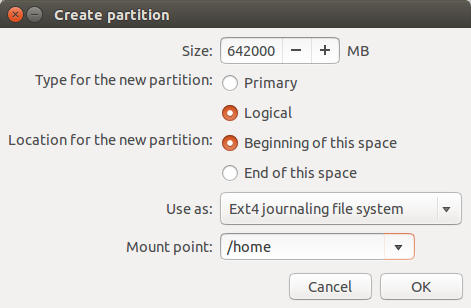
Find the large department of gratis space over again, click on information technology and press the plus symbol once again (+).
This time you want to prepare the size to be the rest of the complimentary disk space minus 2x the amount of memory in your computer.
If you lot take 8 gigabytes RAM, subtract 16 gigabytes.
Again choose "Logical" every bit the sectionalisation type, beginning of this space for where to put the partition and EXT4 as the file organization.
For the mount bespeak choose /home.
The upshot of how much bandy space to use is constantly upwardly for contend. Some people say you don't demand any at all, some become for 1.5 times the amount of RAM and some say 2x.
Unless disk space is at a premium I would just go for the 2x and accept done with it.
In theory if yous are running lots of intensive processes such equally video editing and so the swap space is used to store memory that isn't currently beingness used (swapped) to disk. This is disk intensive and slows downward your computer only it will help to forbid a crash. Swap space is also used for suspending your computer.
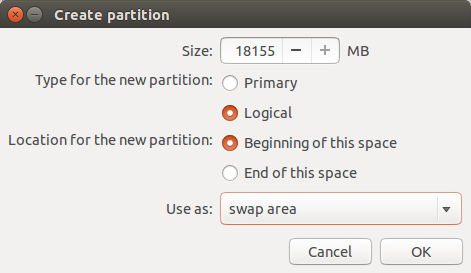
Now observe the free disk space again, click on it and press the plus symbol. (+).
Leave the size every bit the rest of the gratuitous disk infinite, choose logical as the file organisation and beginning of this space every bit the location.
Choose "bandy area" as the mount point.
The concluding thing to concern yourself with when partitioning is where to install the boot loader.
By default it is set to /dev/SDA on the "Installation Type" screen. This can be inverse merely unless you are using multiple disks you lot should leave this well solitary.
Printing "Install At present" to proceed.
The installation has now begun but whilst information technology is taking place you are asked a few configuration type questions.
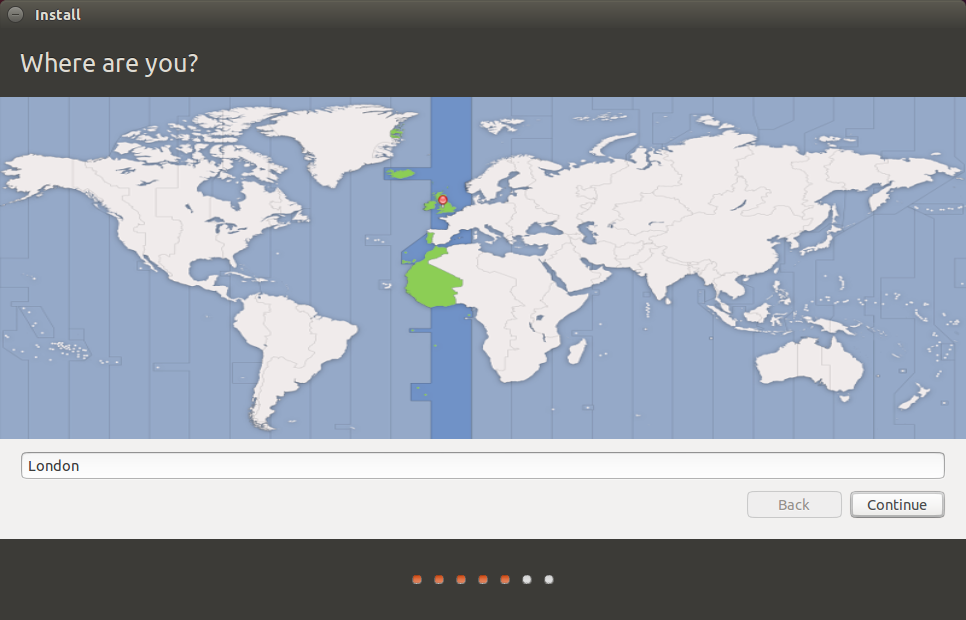
First of all choose your location by clicking on the map.
Press "Continue".
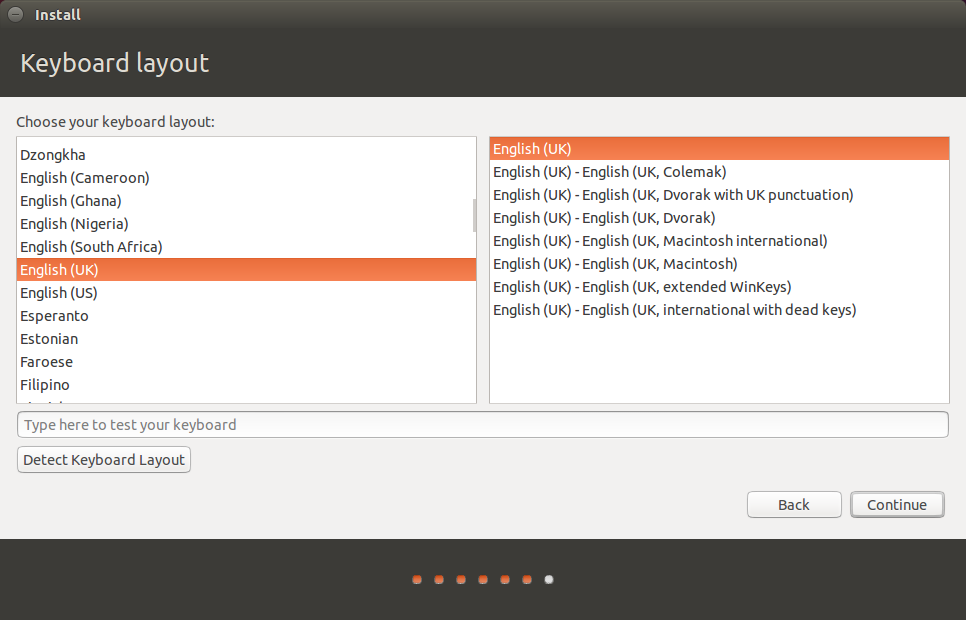
The next screen asks you lot to choose your keyboard layout.
Just choose the right i for you lot and press "Go on".
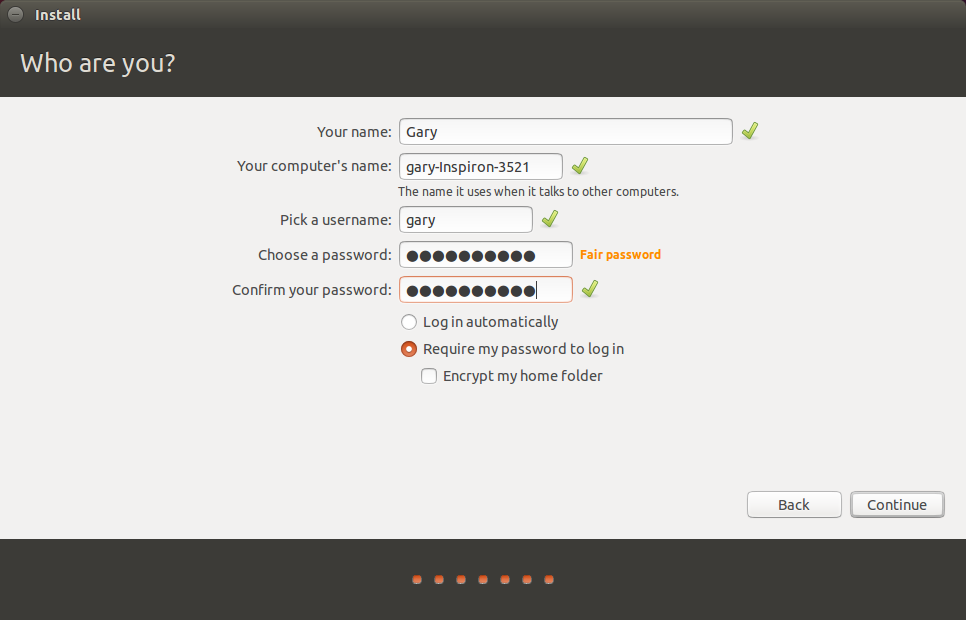
You lot will now be required to create a default user.
Enter your name, a name to identify your computer, a username and a password.
You tin can also choose whether to log in automatically or require a password each time.
A progress bar will now prove you lot how far through the installation you are.
You can also view a selection of letters telling you all about Ubuntu.
At this point you lot can take another comfort break and depending on your computer'due south speed you lot will either accept fourth dimension to boil an egg or wash your auto.
At the end of the process yous will be asked whether you want to reboot to start using Ubuntu or to continue using the alive version.
When I rebooted it went straight dorsum into Windows and I had to reboot back into the alive session anyway. And so at this bespeak you can either take my word for it and stay in the alive session or yous can reboot and meet if the installation has worked without any further steps required.
seven. Boot Repair
I am going to presume that you chose to restart now and your computer booted straight into Windows without giving the option for Ubuntu.
Log into Windows and click the ability icon adjacent to your username in the top correct corner.
Hold downwards the shift central and select to restart your computer. Keep the shift key held downwards until your computer reboots.
At the point of the UEFI settings appearing cull to boot from USB again.
You will now be booted back into the alive session of Ubuntu.
Click on the network icon in the top correct corner and choose your network connexion. Y'all volition probably demand to enter the security key. (If not then when yous have finished with this procedure consider checking your router settings because your internet connection is wide open up).
At present open up a terminal past pressing the "super" key (Windows fundamental) and typing "term".
Within the terminal window enter the following commands one by one.
sudo add together-apt-repository ppa:yannubuntu/boot-repair sudo sh -c "sed -i 's/trusty/saucy/g' /etc/apt/sources.listing.d/yannubuntu-boot-repair-trusty. list" sudo apt-get update sudo apt-get install -y kicking-repair && boot-repair
Eventually the kick repair screen will appear.
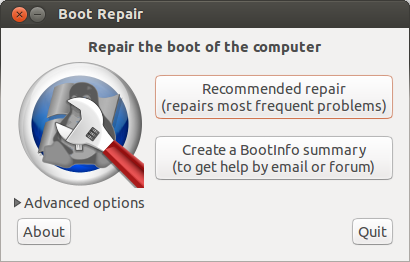
Click on the "Recommended repair".
When I did this I received a bulletin stating "EFI is detected". This is just an informational message as far as I am concerned because information technology is perfectly fine to install Ubuntu with EFI turned on.
Later on clicking "OK" to the EFI detected bulletin the utility performed a few tasks and and then asked me to select some text and run it in a terminal window.
If y'all are asked to do this open a new final window (press the "super" key, enter "term" into the Dash and click on the icon that appears).
Copy the text from the boot repair window by selecting it with the mouse. Press CTRL and C and then correct click in the terminal window and select paste.
Make certain all the commands have run correctly. You may need to press return to get the last command to run.
At present click on the "Forward" button inside the boot repair application. You may be asked to copy and paste more text.
Repeat the process of selecting all the text, press CTRL and C and then correct click in the terminal window and select paste.
Make certain the commands run.
Continue following through on the process until the boot repair finishes.
If you are like me then at the very terminate of the process you volition see a message stating that boot repair completed with errors. (not good). It is worth copying the link and posting to pastebin as suggested simply I think you can only continue onto the next step.
8. Fix the boot loader
Almost there now.
Reboot your reckoner.
Unless you lot are lucky information technology will still kick directly into Windows and really this is ok considering we are going to employ Windows to fix the kicking loader.
Log into Windows and brand sure yous are viewing the desktop and not the tiles screen.
Hover the mouse in the bottom left corner and correct click. Yous should come across an option for the administrator's command prompt. Click on this option.
Inside the administrator's command prompt type the following command:
bcdedit /fix "{bootmgr}" path \EFI\ubuntu\grubx64.efi
Exit the command prompt.
9. Reboot into Ubuntu
Reboot your computer.
This fourth dimension when the estimator boots you should run across 4 options.
1. Ubuntu
2. Ubuntu (advanced)
3. Windows (might say something similar similar Windows boot options).
4. Setup
Choose option 1.
Ubuntu 14.04 should now announced. Get yourself a beer, y'all have earned it.
10. Reboot into Windows
Reboot your computer (click the symbol in the pinnacle correct corner, click shutdown and restart).
This time when the kicking menu appears click on the Windows choice.
Your computer should kicking back into Windows 8.
Troubleshooting
The steps I have written here are the steps I went through to become Ubuntu fourteen.04 to dual boot with Windows 8.ane on my Dell Inspiron.
The procedure will hopefully work on other computers also and as with my concluding guide I volition do my best to assist people and analyze the points inside the article.
I can't guarantee success in every case as this doesn't appear to exist an exact scientific discipline.
If you desire to save yourself some real hassle then you lot might consider viewing my article "How to buy a laptop pre-installed with Linux".
You could do worse than buy a calculator pre-installed with Ubuntu (make certain it will include fourteen.04 and not 12.04) or purchase a figurer without an operating organization at all and install Ubuntu from scratch.
Brand sure you take a backup before attempting to dual boot Windows viii.ane and Ubuntu 14.04.
Further reading
![]()
I accept written an eBook which volition assist you get to grips with Ubuntu.
Information technology includes capacity describing the user interface, the dashboard, lenses, applications and many other topics.
Click here to buy ![]() on Amazon.
on Amazon.
Summary
Feel gratuitous to leave comments and if you constitute this guide useful share it using the buttons below equally it may help other people as well.
Thankyou for reading.
Troubleshooting
If Ubuntu withal will non boot later on running EFI Boot Manager try reading this guide which aims to help with UEFI boot issues.
Source: https://www.everydaylinuxuser.com/2014/05/install-ubuntu-1404-alongside-windows.html
Posted by: mcbridefarretionly.blogspot.com
0 Response to "How To Install Windows On Ubuntu 14.04"
Post a Comment